Part 2: Create a Package
1. How to make your services easy to move and share
If we want to be able to easily move our led service from one project to another, it's really more convenient to have something similar to the other services we have on the project (pipe, gate, blinker) to prevent us from copying and pasting multiple pieces of code.
The service you just created doesn't need any direct access to any other services on your network. But the other services still have the possibility to interact with it. This is the purpose of microservice: it is allowing you to have loosely coupled pieces of code.
Thanks to that, we can put the service in a folder, move it as we want, and share all our services extremely easily. We call it a package.
Packages also allow you to have plenty of code in your project while keeping it clean anyway! Let's see how to create one.
2. How to create your package
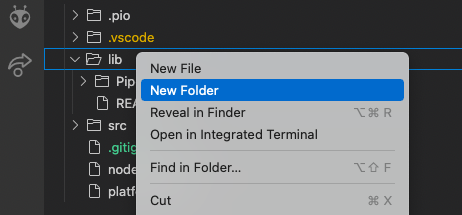
First, you will have to create a dedicated folder on your lib folder and call it Led:


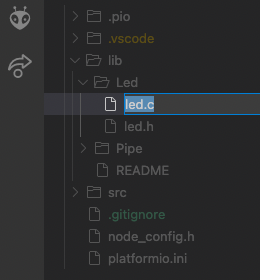
Then in this folder create 2 files, led.h (header file) and led.c (main file) :


In the header led.h file, we declare functions allowing us to call the packages from the main file led.c. These functions are declared in the header files in order to give access to other functions in other files.
#include "luos_engine.h"

void Led_Init(void);
void Led_Loop(void);
We can now create and fill in these functions led.c. Like in your main file, a package needs 2 functions: Init, which is called one time at the begining, and Loop which is called periodicly:
Begin your function with the name of the package is a Luos convention: Led_Init
- Arduino
- Nucleo
#include "led.h"
#include "Arduino.h"

void Led_Init(void)
{
}

void Led_Loop(void)
{
}
#include "led.h"
#include "gpio.h"

void Led_Init(void)
{
}

void Led_Loop(void)
{
}
3. Put the led service into your package
To finish, you have to move the code you created in Arduino.ino or main.c directly into led.c:
- Arduino
- Nucleo
#include "led.h"
#include "Arduino.h"

// the new line to copy and paste
void Led_MsgHandler(service_t *service, msg_t *msg);

void Led_Init(void)
{
    // the three new lines to copy and paste
    pinMode(LED_BUILTIN, OUTPUT);
    revision_t revision = {1, 0, 0};
    Luos_CreateService(Led_MsgHandler, STATE_TYPE, "led", revision);
}

void Led_Loop(void)
{
 // Nothing to do here in the case of the lED because everything is made on event on Led_MsgHandler.
}

// the new block to copy and paste
void Led_MsgHandler(service_t *service, msg_t *msg)
{
    if (msg->header.cmd == IO_STATE)
    {
        if (msg->data[0] == 0)
        {
            digitalWrite(LED_BUILTIN, false);
        }
        else
        {
            digitalWrite(LED_BUILTIN, true);
        }
    }
}
#include "led.h"
#include "gpio.h"

// the new line to copy and paste
static void Led_MsgHandler(service_t *service, msg_t *msg);

void Led_Init(void)
{
    // the two new lines to copy and paste
    revision_t revision = {1, 0, 0};
    Luos_CreateService(Led_MsgHandler, STATE_TYPE, "led", revision);
}

void Led_Loop(void) {}

// the new block to copy and paste
static void Led_MsgHandler(service_t *service, msg_t *msg)
{
    if (msg->header.cmd == IO_STATE)
    {
        if (msg->data[0] == false)
        {
            HAL_GPIO_WritePin(LED_GPIO_Port, LED_Pin, false);
        }
        else
        {
            HAL_GPIO_WritePin(LED_GPIO_Port, LED_Pin, true);
        }
    }
}
You can now directly integrate Led_Init and Led_Loop functions in Arduino.ino or main.c file like the other packages :
- Arduino
- Nucleo
#include <Arduino.h>

#ifdef __cplusplus
extern "C"
{
#endif

#include <luos_engine.h>
#include "blinker.h"
#include "pipe.h"
#include "gate.h"
// the new line to copy and paste
#include "led.h"

#ifdef __cplusplus
}
#endif

void setup()
{
    Luos_Init();
    Pipe_Init();
    Gate_Init();
    Blinker_Init();
    // the new line to copy and paste
    Led_Init();
}

void loop()
{
    Luos_Loop();
    Pipe_Loop();
    Gate_Loop();
    Blinker_Loop();
    // the new line to copy and paste
    Led_Loop();
}
#include <luos_engine.h>
#include "blinker.h"
#include "pipe.h"
#include "gate.h"
// the new line to copy and paste
#include "led.h"

void SystemClock_Config(void);

int main(void)
{
    HAL_Init();
    SystemClock_Config();
    MX_GPIO_Init();

    Luos_Init();
    Pipe_Init();
    Gate_Init();
    Blinker_Init();
    // the new line to copy and paste
    Led_Init();

    while (1)
    {
        Luos_Loop();
        Pipe_Loop();
        Gate_Loop();
        Blinker_Loop();
        // the new line to copy and paste
        Led_Loop();
    }
}
4. Test your new package
First, compile and upload the project to the board.
Then, use pyluos-shell to make a detection and you should see the following routing table:
    ┏━━━━━━━━━━━━━━━━━━━━━━━━━━━━━━━━━━━━━━━━━━━━━━━━━━┓
    ┃  ╭node 1            /!\ Not certified            ┃
    ┃  │  Type                Alias               ID   ┃
    ┃  ├> State               led                 2    ┃
    ┃  ├> Pipe                Pipe                3    ┃
    ┃  ├> Gate                gate                1    ┃
    ┃  ╰> Unknown             blinker             4    ┃
  ╔>┗━━━━━━━━━━━━━━━━━━━━━━━━━━━━━━━━━━━━━━━━━━━━━━━━━━┛
5. Exercise
Now try to move your led package on another board. Keep only the led package on this second board, and keep the pipe, the gate, and the blinker into the first one. Then wire a OneWire network as you learned in Part 3 in the Get started.